I planned to measure the temperature changes of our electric water heater with an Arduino. Then I wanted to create a chart from the logged data. I planned this as I was curious how the temperature drops and raises as time passes.

Unfortunately because of the insulation there is no place to put the temperature sensor for measurement. This is the thermistor I get from a laptop battery. So this project has to be postponed.
Nevertheless the Arduino circuit is ready, I have the code as well, so I will share it with my readers. The code measures the temperature in the given time intervals, then it stores them in the internal memory. This EEPROM is limited however to 1024 Byte on my Arduino, so I can only save 1024 times, a number between 0-256. If I take a measurement in every 30 seconds, then it is enough to log the data for 8 hours. The data will not be lost if we turn of the Arduino.
An 10000 Ohm resistor and a thermisor is required. The picture shows how to connect the parts.

I have soldered a longer cable on the thermistor for easier handling:

Code for temperature measurement:
#include <EEPROM.h>

// we have to define which analog input we want to use
#define THERMISTORPIN A0
// we have to set the memory address to 0 as the first address
int addr = 0;

void setup(void) {
  Serial.begin(9600);
  pinMode(13, OUTPUT);
}

void loop(void) {

  float reading;
  //we take a measurement
  reading = analogRead(THERMISTORPIN);
  //here we divide it with 4 as we can only save a number between 0-256
  int val = analogRead(THERMISTORPIN) / 4;
  // we save the value
  EEPROM.write(addr, val);
  //we jump to the next address
  addr = addr + 1;
  if (addr == EEPROM.length()) {
    addr = 0;
  }
  //we wait 30 seconds then we take an other example
  delay(30000);
}
Code to read out the memory contents:
/*
 * EEPROM Read
 *
 * Reads the value of each byte of the EEPROM and prints it
 * to the computer.
 * This example code is in the public domain.
 */

#include <EEPROM.h>
// the value of the 'other' resistor
// start reading from the first byte (address 0) of the EEPROM
int address = 0;
int value;
double Temp;
void setup() {
  // initialize serial and wait for port to open:
  Serial.begin(9600);
  while (!Serial) {
    ; // wait for serial port to connect. Needed for native USB port only
  }
}

void loop() {
  float reading;
  // read a byte from the current address of the EEPROM
  value = EEPROM.read(address);

  Serial.print(address);
  Serial.print("\t");
  Serial.print(value, DEC);
  Serial.print(" ");
  //we have to multiplicate it with 4 to get the initial measured value as we saved a value which were divided by 4
  value=value*4;
  Serial.print(value);
  //this is a formula to be used to convert the measured reading to celsius the calculation is from: https://en.wikipedia.org/wiki/Thermistor
  Temp = log(((10240000/value) - 10000));
  Temp = 1 / (0.001129148 + (0.000234125 * Temp) + (0.0000000876741 * Temp * Temp * Temp));
  Temp = Temp - 273.15;           // Convert Kelvin to Celcius

  Serial.print(" Temperature ");
  Serial.print(Temp);
  Serial.println(" *C");
  /***
    Advance to the next address, when at the end restart at the beginning.

    Larger AVR processors have larger EEPROM sizes, E.g:
    - Arduno Duemilanove: 512b EEPROM storage.
    - Arduino Uno:        1kb EEPROM storage.
    - Arduino Mega:       4kb EEPROM storage.

    Rather than hard-coding the length, you should use the pre-provided length function.
    This will make your code portable to all AVR processors.
  ***/
  address = address + 1;
  if (address == EEPROM.length()) {
    address = 0;
  }

  /***
    As the EEPROM sizes are powers of two, wrapping (preventing overflow) of an
    EEPROM address is also doable by a bitwise and of the length - 1.

    ++address &= EEPROM.length() - 1;
  ***/

  delay(50);
}
The first code has to be run first and we should wait for the data collection for the decided timeframe. Then the read out code can be run to get the results. As a test I have measured the radiator temperature changes for 6 hours. The outside temperature has dropped from 43 F to 37 F. The beginner temperature in the room was 73 F.
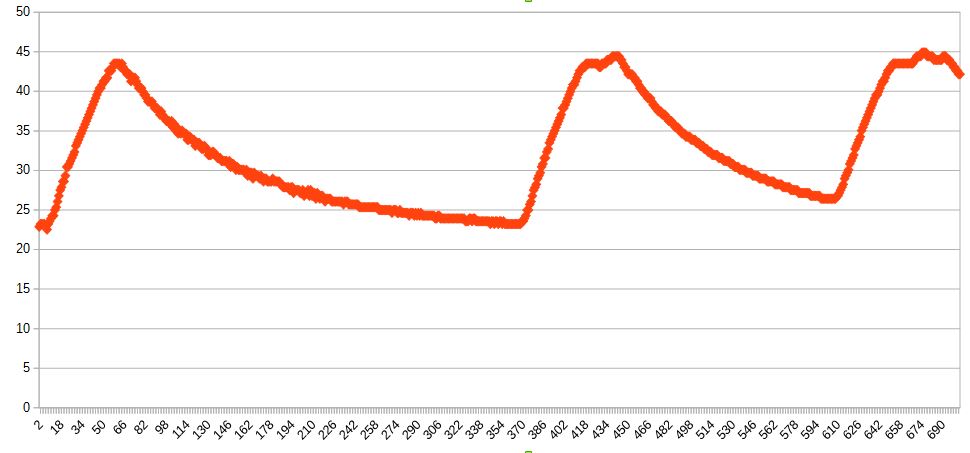
It is clearly visible that the radiator temperature rises very fast when the heating is on, then when it turns off, the temperature drops in an ever smaller scale until it reaches the room temperature. At the second and the third peak there is a slight temperature drop caused by the heating control. As the thermostat reaches the desired temperature it turns off the heating, but the water pump turns on again for a short period to take out the heat from the boiler.
Nincsenek megjegyzések:
Megjegyzés küldése