2016. január 25., hétfő

DIY Universal USB charger


UPDATE 1: I had to put a diode into the cable, because it seems a Chinese battery charger can push the charge back to the Nokia power supply. I used a 1N4001 diode to the cable of the power supply's "+" side, which can withstand 3A and it has 50V Reverse voltage.

I was having trouble charging my Smartphone. I do not have a wall outlet AC charger for it, so I always had to charge it from my computer with an USB cable. But in this way the charging was a bit slow, since the computer only supplies 500mAh of current through the cable. The computer had to be turned on as well. I wanted to change this. I have an older 2007 Nokia phone charger, which charges the phone with 5V. It is funny that Nokia has been since bought by Microsoft. In the beginning of the 2000 years Nokia was a leader in the phone market. So the Nokia charger has only a pin connector as can be seen on the picture.


I have cut the charger cable in two. I took an USB extension cable, I cut it in half as well, then I soldered the USB mother connector to the charger side, the father connector to the other side. As it can be seen on the picture. Now I have a universal USB charger which can charge with 900mAh as written on the charger. I can connect any USB cable to it and as it is a quality charger I do not have to fear from cheap chargers from ebay.


One more interesting thing I would like to note. There are some smart things what do not charge themselves with all the available power from the charger, if the two data cable in the USB cable is not shorted. I have a handheld computer (PDA) from 2007. If the two data line is not shorted, it charges itself slower than if they are shorted. This PDA has a car charger which charges with 1A, but I have bought another car charger which does not charge it this fast. It turned out that this is because the data lines are not shorted here. I simply shorted them on the charger side, so the units charge themselves faster.


2016. január 24., vasárnap

Convert your calculator to run on rechargeable batteries


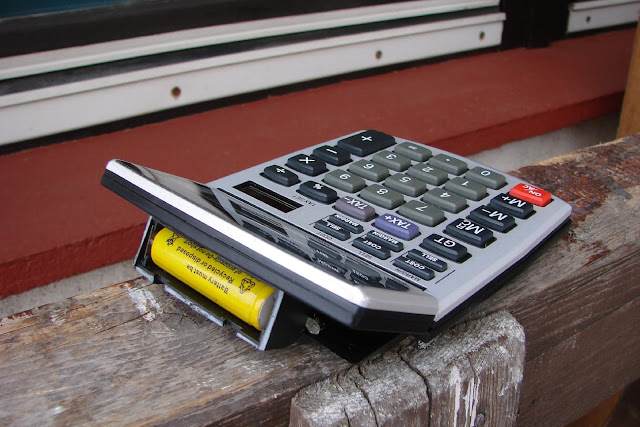
I have a solar powered calculator, which is cool, but it stopped working recently that the light bulbs are changed either to leds or fluorescent bulbs. After disassembly it turned out, that it has a 1,5V button battery which helps powering the device together with the solar cell. But the battery has drained, so it worked only from solar power. However as the light from the new light sources is not enough, it only works if I put it so close to the light. It does not work on the table. I decided to add an AA battery case which would power it instead of the button cell and it would also last longer and rechargeable.


I had some solar powered garden lamps which do not work, I took the battery case from this. I have cut the unneeded plastic from the battery case. I can also use the NI-CD 600 mAh battery from it. If it would drain too fast, I can switch to normal AA alkalines.


Strangely there is a green led on the circuit board, it can be seen on the upper part. It seemed that it is there unnecessarily, only draining power without purpose. I thought if I take it out, the solar cell will give enough power to run the calculator from the desk. However once I removed it, it still does not worked from the desk, if I moved it closer to the light, it turned on, but the display get too much power and it became dark. So the led is there simply to regulate the current. It seems to be ridiculous.
And it turned out, that the calculator only turns on if the voltage is sufficient. So there is no dim display, you can only use it if it gets a certain amount of voltage. I do not think this is a good design. So my only chance left is to connect the battery to the button cell case on the circuit board.


I used a two sided glue tape to stick the battery case to the calculator case. Luckily the display can be lift up so the extra battery case has space behind it. If it would not bend, I would have to stick it under the frame. The setup works great, the solar cell helps to the AA battery to power the calculator.


2016. január 22., péntek

Fridge hack - How to create a fridge which consumes only 0,1 KWh per day?

Hungarian version.

I have found an interesting webpage. Here. The fridges these days if they have a consumption rating of A+, consume around 0,7 Kwh/day. Why is the design of today's fridges wrong? As we open the fridge door, all of the cold air spills out of it, because of the physical laws. So the air inside needs to be cooled down again and again after each door opening. This requires lots of energy. However there are chest freezers which have a door what opens upwards not to the front. This is a great idea! In this way the cold air does not spill out and the freezers are better insulated as well. The freezer should be modified in a way that it would cool the inside air to 41 degrees Fahrenheit instead of -0.4 degrees Fahrenheit. So we would have a freezer which has a door opening upwards, the cool air does not spill out with a door opening and it is very well insulated. Well, here comes the hack. You can buy on E-bay a digital thermostat for 10 dollars including shipping. Our job is only to change the fridge previous thermostat to the digital one. In this way we can set a temperature when the compressor should turn on and when to turn off. It is a brilliant and yet simple idea! There is unfortunately a downside. A chest freezer is harder to fill with
food than a standing fridge. And it is harder to get things out of it. But, no pain, no gain. I think I will hack one freezer if I will have the chance. I encourage everyone who likes to tinker with thing to try this out. The site what I have linked says that with the modification the freezer's power consumption went down to 0,1KWh. I do not know if this can be achieved, but if the consumption would be cut in half, it would completely worth it!